Dreaming of a new life in Canada with permanent residency? This easy, step-by-step guide will show you how to create your Express Entry profile, saving you both time and money like I did.
Creating an Express Entry profile is simpler than many think, and you don’t need to pay agents big fees to do it for you.
Let’s get started on making your dreams a reality with Mapple dreams.
Express Entry Profile Creation Checklist & Documents Required
To create a express entry profile online, you will need all these details and required documents:
| Required Details/Documents | Examples and Explanations | |
| #1 | Personal Reference Code: | A unique identifier for your application process. |
| #2. | Names: | Your legal first, middle, and last names as they appear on official documents, if you have changed your name, then legal name change document will be required. |
| #3. | Gender: | Your gender identity. |
| #4. | Birth Details: | Your date of birth and the city and country where you were born. |
| #5. | Marital Status: | Your current marital status. e.g. Single/Married/Divorced |
| #6. | ID Documents: | Information from identification documents, like passport numbers. |
| #7. | Family: | How many people depend on you financially. |
| #8. | Settlement Funds: | The amount of money you must have for settling in Canada as per the Express Entry requirements. |
| #9. | Education: | Your educational background, including evaluations e.g. WES ECA |
| #10. | Language Skills Details: | Scores from language proficiency assessment tests. e.g. IELTS, TCF, date of which exam taken and score. |
| #11. | Work History: | All the complete details of your employment history and relevant NOC Code. |
| #12. | Passport/Travel Documents: | Passport or travel document details. e.g. issuing date, passport number, expiration date etc. |
| #13. | Province Choices: | Which Canadian province(s) you’re interested in, you must have this in mind before creation of express entry profile. |
| #14. | Provincial Nomination: | If you have a nomination from a province. e.g. I got nomination from SINP PNP. |
| #15. | Job Offer Details: | (Optional) Details of any job offers in Canada if you have got any. |
| #16. | Representative Details: | (Optional) Information about any legal or immigration representatives. e.g. if you’ve hired an agent to create your profile, then provide the information about that consultant. |
If you have all these details ready to go, please proceed further, otherwise I strongly recommend you to have all these important details and documents ready before starting the process.
In this guide, I am going to explain 15 easy steps on ‘How to Create Express Entry Profile for Canada in 2024?‘
I know everyone has their own story of the struggle to get PR of Canada and I too have.
How to create Express Entry Profile? Step-by-step Guide
Let’s start with the express entry profile creation steps. Follow each and every step carefully before you proceed.
Before continuing, I would like to clarify that please do not copy my information, this is just for example purposes. Fill entire information very carefully.
#1. Express Entry Profile Sign Up
Go to Google.com and type ‘express entry profile login’ and press enter.

Click on the first link which leads you to the official website of the Canadian government.

You will be seeing this page on your screen.

Scroll down the page and click on the “Continue to GCKey” button which takes you to the welcome page of GCKey.


So, if you are a returning user or already signed up, just log in to your account otherwise click on the “Sign Up” button on the right-hand side of your screen to create a new account.
#2. Create your Username/Password
The next screen will ask you to accept or decline the terms and conditions of GCKey; simply click on the “I accept” button which further leads to the “Create your Username” page describing the recommendation of creating a username.
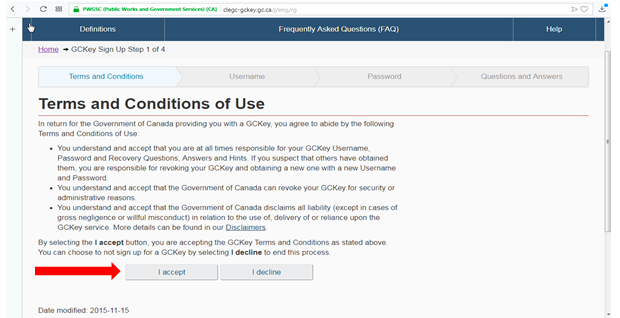
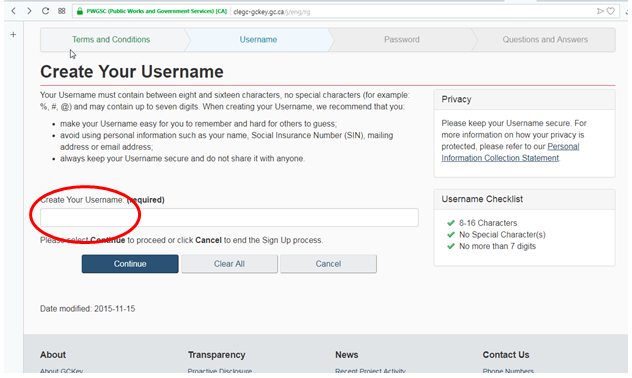
Remember, your username should be at least 8-16 Characters, No Special characters, no more than 7 digits, must contain between eight and sixteen characters, no special characters (for example: %, #, @). Enter your required username and press continue.
Create Your Password
The next screen will of “Create Your Password” where you have to enter the required password by providing guidelines.
Just enter the password and press “Continue”.
Create Your Recovery Questions and Answers
The next page will ask you to enter some recovery questions and answers with their hints. It is an essential step, so putting that information which you can easily remember, helps you to recover your account whenever needed.
To answer the “Hint” section is optional so I am not putting anything in it but yes if you think you can forget the answers in the future, do write in the “Hint” section whatever is required and press the “Continue” button.

Here’s complete the “Sign up” process. The screen will display your username; put your user name; then press “Continue“
GCKey Sign Up Complete

Until now this was the procedure of creating a username of GCKey and now we will start creating our express entry account by filling in personal information.
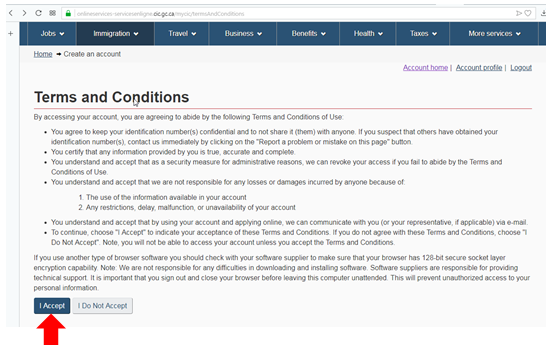
The next page shows you some general terms and conditions. Click on the “I Accept” button.
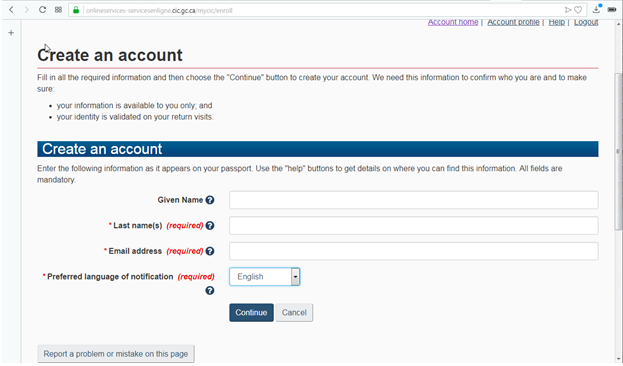
#3. Create an Account
Start filling in your personal information in the following screen appears and press the” Continue” button.
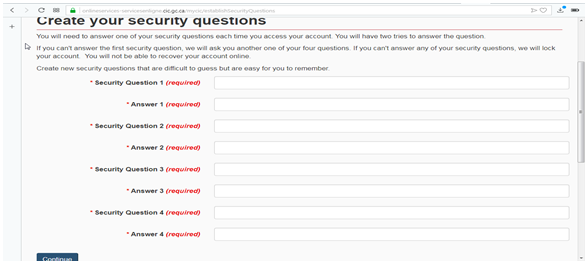
Create your security questions
On the next screen, you need to fill in security questions and answers to your choices which you will need every time you logged in to your express entry profile.
Hence make sure you only entered those questions and answers which you can easily remember. Fill in the details and press the “Continue” button.
‘Your’ Account
After pressing the “Continue” button, the following screen will appear. This is basically the HOME page of your account from where you can operate your express entry profile.

Scroll down the screen and you must be seeing “Apply to come to Canada” under “Start an application” heading; click on it; the following screen will appear which asks you to enter a personal reference code to enter.

Now, What the personal reference code is?
Personal reference code is generated when you answer the express entry wizard questions or simply when you provide each detail asked by CIC to check whether you are eligible for express entry or not.
As you are a new user obviously you do not have a personal reference code so you just click on “Express Entry (EE)” under “I do not have a Personal Reference Code”. The following screen will appear:

You need to put every information correctly and carefully whatever CIC is asking from you to ensure that you are eligible for Express Entry or not.
Start entering your information and click on the “Next” button.
#4. It will ask you the following information in a Series of Steps:
1.) Which province or territory do you plan to live in?
Select any province whichever you want. However, it is not necessary that you will definitely live in that province only if you get permanent residency in the future. It totally depends upon you where do you want to live in Canada after PR.
In some cases, if you are getting permanent residency under the PNP program then you have to stay in that province only under which you are getting 600 points of nomination. I will confuse you more with the PNP program over here. Please see my post on how the PNP program works. For now, just select any province of your choice and press the “Next” button.
2.) Which language test did you take for your first official language?
Select one particular test whichever you have taken “IELTS” or “CELPIP” or “TEF” or “TCF” and press the “Next” button.
3.) What date did you take this test?
Enter the year, month, and day of your test taken. Press the “Next” button.
4.) Enter your test scores and press “Next”
5.) Do you have other language results? Which language test did you take for your second official language?
Select any other test name whichever you have taken except that test which you have selected in the second step or select “None” if you have not taken any other test.
6.) In the last three years, how many years of skilled work experience do you have had in Canada? It must have been full-time (or an equal amount in part-time)
Select the years of work experience you have in Canada. Yes, you read it right, it is in Canada. However, select “None” if you do not have any work experience in Canada.
- During this period, which the National Occupation Classification (NOC) level is most of the experience in?
If you have work experience in Canada then you have to select the NOC level in which you are experienced. If you selected “None” in the above question then just select “None of the above” and press the “Next” button.
7.) In the last 10 years, how many years of skilled work experience do you have? It must have been continuous, paid, full-time (or an equal amount in part-time), and in only one occupation.
Select the years of your work experience in your home country and any other country except Canada.
In the last five years, do you have at least two years of experience in one of these types of jobs (skilled trades)?
Select years of skilled trade experience if you have any. Otherwise, select “None” and press the “Next” button.
8.) How much money (in Canadian dollars) will you bring to Canada? And How many family members do you have?
Before answering this question do read the following link carefully and yes twice if needed before selecting any figure from the drop-down menu :
Check: Proof of funds – Skilled immigrants (Express Entry)
For your ease, Proof of funds should be 6 months old in your account(s) and how much funds you need to bring in Canada depends upon the family members but my serious recommendation is to read the whole page of the above-mentioned link before perusing.
9.) Do you have a valid job offer in Canada?
The job offer is referring to the offer given by any Canadian company to work with them. Most people do not have a job offer as it is very difficult to acquire it. In my case, I also tried many times via Indeed or mailing so many employers but all in vain. I am considering my case in this post with no job offer. Select “Yes” or “No” according to your job offer status and press the “Next” button.
10.) What is your date of birth?
What is the highest level of education for which you have earned a Canadian degree, diploma, or certificate, or have had an Educational Credential Assessment? (ECAs must be from an approved agency, in the last five years.)
If you did not earn a Canadian degree, diploma, or certificate, you may need to have your foreign education assessed by an agency approved by Immigration, Refugees, and Citizenship Canada. They must show that it is valid, and equal to a completed Canadian credential.
Select your DOB from the dropdown. Now, what the ECA is, Educational Credential Assessment (ECA) verifies that your foreign degree, diploma, the certificate is valid and equal to a Canadian one. If done once, it is valid for the next five years from the date of the issue.
| Here is: How to Apply for WES ECA For Canada Express Entry? |
It is essential to have an ECA done before making an express entry profile. You can apply for ECA from various designated organizations as in the above-mentioned link. To answer this question, make a selection of your education which is accessed by any of the designated organizations. Press “Next” to continue.
11.) On this step, you need to check all that apply in your case like you study in Canada, work experience in Canada, relative in Canada, and none of the above. Press “Next” to continue.
12.) Select your marital status and press the “Next” button.
13.) As in my case, I am a married woman so in the last step I select married from the drop-down in this step portal will ask you whether your partner comes to Canada with you or not and whether your partner is a permanent resident of Canada or not. Select options from the drop-down according to your case. Press the “Next” button.
14.) You need to give a little bit more details of your spouse in this step regarding his/her study and work in Canada. Press the “Next” button.
15.) Select any language test which your spouse has taken and press “Next”.
16.) Select his/her test date and press “Next”.
17.) Select the score of your spouse and press “Next”.
18.) Finally, here comes the final step of the express entry eligibility test. I can see a small smile on your face. Take a look;

Press the “Continue” button.
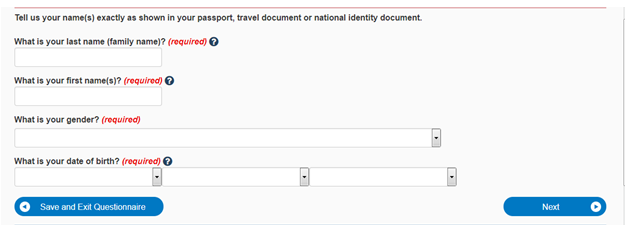
Now, we are on filling in details of the express entry profile. Be very careful and cross-check everything before and after entering any information in the portal. Following is the next screen. Fill details according to your passport and press “Next”.
Select your marital status and whether your partner will accompany you to Canada or not. If yes then fill in the details of your partner and press “Next”.
#5. Candidate Express Entry
The next screen will be of various application forms screen for you and your spouse which you have to fill step by step. To start filling out a form, press the “Start form” button.

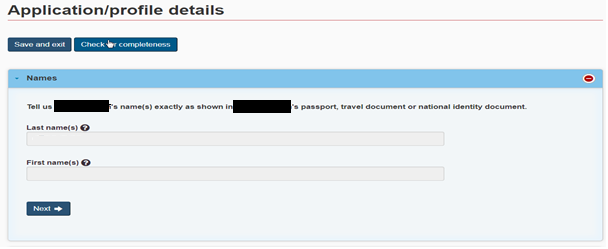
The very first screen when you click on “Start form” corresponding to “personal details” comes:
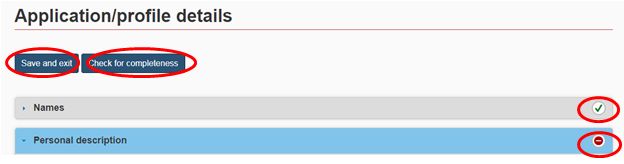
#6. Let me explain the various small things over here:
- The “Save and exit” button is used to save your profile at any step and exit it from there after saving it. When you come back to your express entry profile, you can start filling in details from that step where you have left.
- The “Check for completeness” button is used to check whether all the fields are complete or not. Remember to double-check each and every detail as incomplete profiles can never be submitted
- Each Form name like personal details, contact details, study, languages, etc. has multiple sections that every candidate has to fill.
- The very small minus symbol in a red circle shows that this particular section is not yet completed. After filling details in each field under each section you need to press “Next” to fill details in the next section and when you press “Next” you can see that the minus symbol turns in the green tick mark which shows this section is completed. Start filling the next section.
You must be seeing various sections under personal details like the following screenshot:
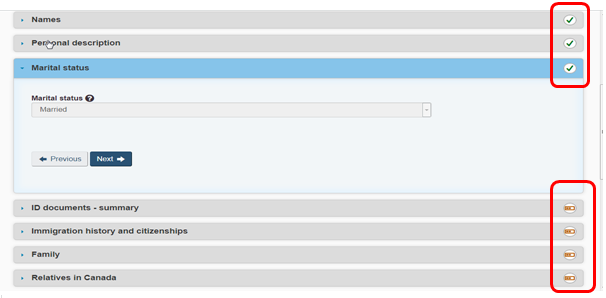
The sections which are getting complete after filling in information will turn into green colour tick marks and the sections which are still to be complete will be showing the “In progress” symbol which is of light brown colour with two bars in it.
#7. ID Documents
Under “ID documents-summary” you need to give information about your passport. Just enter details carefully and press the “Save and add” button.
Add all the passports you have.
When you add one passport detail and press the “Save and add button”; the fields will get blank to add another detail. If you have only one passport then just jump to the next section and if you have any other one add your passport details and it will be added like this:

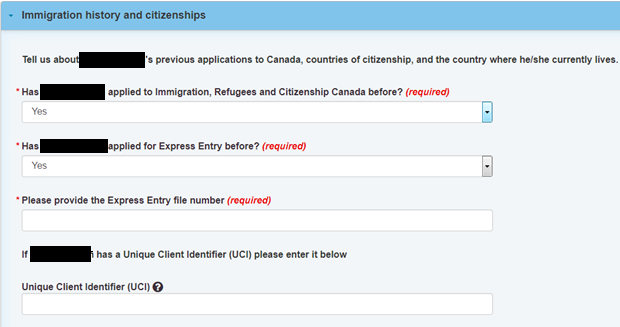
#8. Immigration History and Citizenship’s
Under “Immigration history and citizenship’s” you need to tell details that have you ever applied to Immigration, Refugees, and Citizenship (IRCC) before.
This is a strict approach that never hides anything in your application no matter what the result will be of your application.
If you applied before then state, Yes and it will ask further to mention your earlier express entry profile if you had applied under express entry and your Unique Client Identifier (UCI) like this:
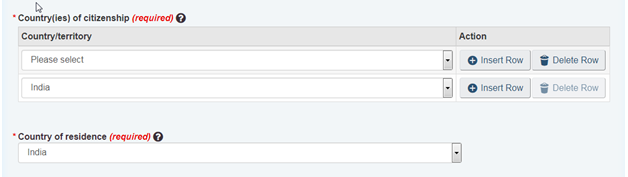
Choose your country (ies) of citizenship and current country of residence. If you have citizenship of more than one country then you have to mention every country over here by clicking on the “Insert Row” button.
Mention your family members and how much money you will bring to Canada. Actually, the answer to this query is that how much money you will bring to Canada depends upon the number of family members.
Hence, please visit the following link before selecting any figure as I had mentioned above.
Check updated: Proof of funds – Skilled immigrants (Express Entry)
Moving towards the next section, mention here if you have relatives in Canada. Your relative should be related by blood or adoption. If yes, mention the relation and province or territory in which your relative live. If no, simply mention no here.

Press “Save and exit” to save the details you have mentioned and exit from this current form.

You can see the green colour tick mark and complete word written in front of the “Personal details” form. You can update at any time by clicking on the “Update form” button.
#9. Contact Details
To start the next form “Contact details” click on the “Start form” button corresponding to it.
Mention “Language of correspondence” and your email address.
Press “Save and exit”.
#10. Study and languages
Jump to “Study and languages” form.
Fill in the details of your study starting from secondary to graduation, post-graduation, and doctoral if applicable like this:

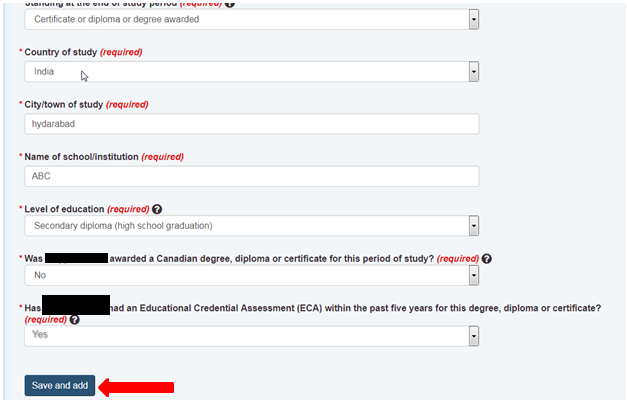
Let me explain the last question over here for your ease. This question is asking about the Educational Credential Assessment (ECA).
As I have filled in details of secondary education there is no need for ECA for schooling education.
ECA is only needed for your graduation, post-graduation, doctoral or any diploma courses. I have explained here how to get an ECA report; you can read it by following this link. Let’s focus on filling in the details further.
Let us take an example of my graduation details now. I have selected “Yes” now under the ECA section and the further portal will be asked me to fill in the details of the issued organization, Date of issue, and ECA certificate number.
In your ECA report, origination has mentioned that your foreign education is equivalent to a Canadian bachelor’s or Masters or Doctoral, etc.
Just select that equivalency in the last question and you are done with one more education detail.
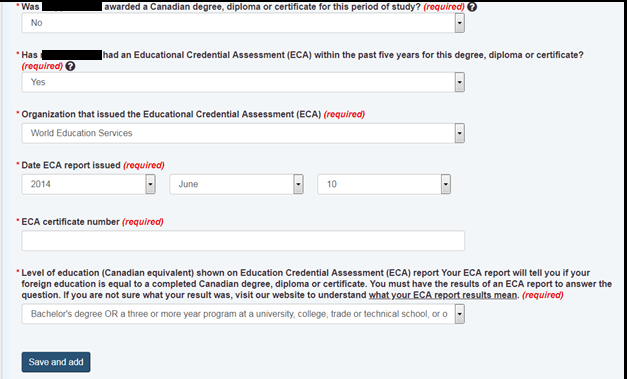
Press “Save and add” every time you add another education and it will be added as shown below.
Please add your details and verify them twice. This post is just to help you. Do not enter details as it is from screenshots. These are just examples to explain to you. Please be careful while entering any information in the portal.

Moving further to the next section, fill in the details of your language test here. Some of the answers are auto-fill because we have filled them while the eligibility test wizard. Enter the remaining answers quickly.
Press “Save and exit”.
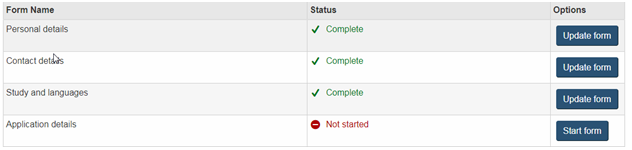
#11. Application Details
You are done with three forms and let us continue with the next form of “Application details”.
Under the “Application details” form you need to check boxes for provinces and territories of interest in which you want to land if you get permanent residency in the future.
Well, at this stage you can check any boxes you want to live in. It is not compulsory at all that you have to go only to those provinces which you have mentioned.
If you get PR via express entry you can land in any province but yes if you are getting PR under the PNP program then you have to land under a particular province.
Under the “Nomination and selection” section select “Yes” if you have received a nomination from any province and further select the name of the province otherwise just select “No”. Press “Save and exit”.
#12. Representative
Under the “Representative” form, give information about if someone else will handle your profile rather than you.
My serious suggestion is not to appoint any person who can look after your profile on your behalf of you because what I think is; that you are much more educated and careful than anyone else.
You know yourself better than an unknown person who will just do business by taking money from you in bulk amounts.
Why give all information about your documents as well as money to them? By reading my post and steps you must be thinking, yes; it is very easy to make an express entry profile and I can make it on my own.
Trust me, if you think like this; my motive for writing this post is achieved.
Even after this post, if you have any queries regarding your express entry profile you can contact me any time via email. I am always there to help you, people, just for saving your capital and valuable time from any inexperienced immigration consultant.
To give you complete information if you are using a representative, Select “representative” from the drop-down and you have to provide your name, email address, and regulatory body ID number which a unique number is given to every immigration consultant. Select “No” if you are not using it. Press “Save and exit”.
#13. Work History
Under the “Work History” form, firstly you need to select your primary occupation NOC code. The meaning of primary occupation is a major field in which you have experience.
For NOC code details please visit the following link before mentioning your NOC code because the selection of NOC code is very important and the 20% of rejection reasons is choosing the wrong NOC code which does not match job duties.
Please be careful when choosing it.
- Check my post on: How to find your NOC code?
Select the date from the drop-down menu when you graduated or post-graduated or doctoral because this is the date you first qualified to work in a particular profession. For trade persons, input the date here when you achieved your license to work in a particular field. Press “Next”.
Make a selection of “Yes” or “No” if you have any certificate of qualification from Canada. Provide further details if yes otherwise press “Next”.
If you have a job offer to work in Canada select “Yes” otherwise “No”. If yes then the portal will ask you so many queries. Provide every detail carefully. Press “Next”.
Providing work history is the most important part of creating an express entry profile because your majority of the CRS score depends upon it.
Select “Yes” from the drop-down list and start entering your work history carefully. You can start from anywhere either from your first job or current job.
Mention everything very clearly here like your education section and press the “Save and add” button.
To add another work detail, start entering again and press the “Save and add” button.
Repeat until your work history gets completed. Press “Next”.
Research
The “Research” section is very much optional. You can choose your answer “Yes” if you want to answer certain questions otherwise “No”. Remember these questions have nothing to do with your profile. Press “Save and exit”.
#14. Spouse Form
Hence, this is the completion of filling in the details of your express entry profile you are a single applicant. If you are accompanying your partner then you need to complete another 3 forms of a spouse like this:
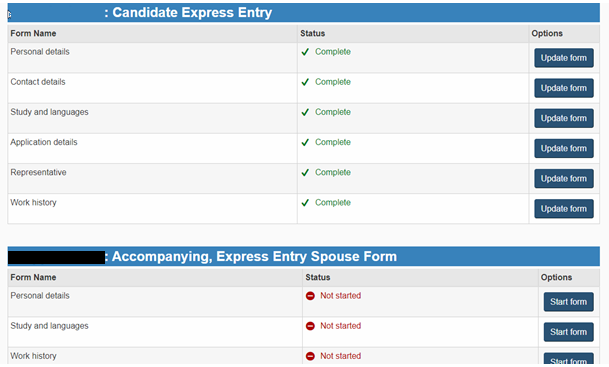
Please fill in the details of your spouse’s form carefully as you have done on your own because the spouse’s details will add CRS in total.
I am not going to explain it again because these are the same steps that you have done under your sections.
As this post is getting lengthy I am handling the job of filling in the spouse’s details for you. Take the help of your partner in crime. 😛
After completion of form details, Press the “Continue” button in the bottom left corner.

The next page will be “Your Declaration and Electronic Signature”.
Scroll down the page and select “I agree” wherever mentioned.
Fill in your name and answer the security question.
Press the “Sign” button in the bottom right corner.

Press “Transmit”.
#15. Congratulations!
The congratulatory message is here.
Press “Exit Questionnaire”.
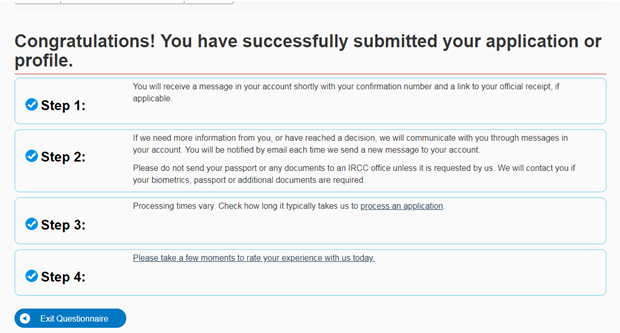
You will be directed to the home page where you can see several details like this:

To check details of your CRS score and messages, click on the “Check full application status” link in the right corner, scroll down the page and you will see the CRS score breakdown and three new messages in your account which is common for every candidate. Save your express entry number and job seeker validation code for future reference.
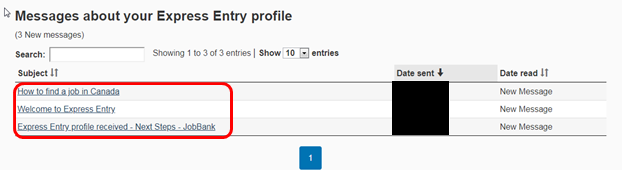
| NOTE: Whenever you get an invitation to apply, you will receive an email in your account stating that “You have a new message in your account. To view your message, sign in to your account.” Whenever you see this message, login in to express your entry profile and a new message will be on the above screen which you can open by clicking on it. |
Why did I create my Express Entry Profile?
My dream of having a Canadian permanent residency started a few years back. This was the year-end of 2014 and we went to some immigration consultant. He said in New Year express entry is going to be launched.
We filed our case with an agent in August 2015 ( got delayed due to a lack of documents). My CRS score was 383 at that time. As I was having a low CRS score so agent told me that they will file my case via any PNP options. This was my biggest mistake when I hired an agent for my file.
One year passed due to the agent’s negligence and we were now in September 2016. Due to some personal reason we were not able to go anywhere.
I was so frustrated at that moment and I took my money back from the agent. They wasted our two years actually.
As my IELTS got expired so I started preparing IELTS on my own and successfully achieved the desired score.
| TIP: Are you new to Express Entry? Must check this guide and check these most common express entry abbreviations listed here: How Express Entry Works? |
This was the time when I started processing my file in May or June 2018 again. Yes, you read it right. I processed my file on my own. I still remember that night when I suddenly woke up at around 01:00 AM and created my express entry profile.
After that, I start research work for various Provincial Nominee Program PNP options. Saskatchewan was my destination. And guess what, luckily found SINP PNP opened 500 intakes and I successfully filed my case.
By god’s grace, I got the nomination from Saskatchewan in January 2019 and I got an ITA in February. My AOR was in late April.
After a long wait, that Golden PPR Email day came at the end of September. Yes, we got our visa stamped in early October and this was the best gift from me to my husband on his birthday.
This was all about my golden Email story and I know so many people eagerly waiting for that email in their mail accounts. I wish your Canadian dreams aka Mapple dreams comes true in 2024.
| SUGGESTION: Please don’t forget to check your SPAM folders, because I received my PPR email in SPAM. |
My motive is to write this post to help you people who waste their resources and most importantly time. From applying for IELTS to WES, CIPS certificate for filling Saskatchewan immigrant nominee program (SINP), and express entry to filling ITA, I have done that all by myself.
Everyone has the potential to do their own work.
|More Helpful Posts:
Final Words about Creating Express Entry Profile
I will wrap up my post by saying, I have put all my efforts to make it up to date and detailed. I hope I had covered every aspect as much as possible, as I am not a professional blogger but I tried my best. I would love to read your comments and suggestions if this blog needs any improvements.
Now I am pretty confident that you guys will be able to create your Express Entry profile yourself following my step-by-step instructions on ‘How to create Express Entry profile?‘.
Just in case after reading this post if you still have any questions regarding express entry, comment down below. I will try my best to provide you with the information regarding your query.
I hated coffee back in India, it was the worst thing to drink for me. But trust me after drinking “Tim Hortons” coffee, you will get addicted to it. 😛 🙂

I hope you all experience Canada’s winter soon 🙂 as I have already experienced really chilly ( minus -40º to -50º ) weather here.

Hi,
I would like to know if the express entry profile can be edited to update any fields?
The main question on editing here is ,my spouse has not taken his Ielts but he will be accompanying me.So, will I be able to add his details after a few days once my express entry profile is created?
Also,in general, pls share your thoughts on edit options
Thanks for your help in advance
Dear Sona, Can you please advise what should be the answer to this question under “Occupation”:
Date XYZ first became qualified to practice in this occupation
If the “primary occupation” is:
. any other job, this is the date they first obtained the minimum education or training stated in the NOC description. (Note: if the NOC only states high school, this is the date they graduated.)
Thank you in advance.
Thank you so much for a detailed blog. This really came at a perfect time, I was so close of giving up because I was failing to understand this whole process, but with this information before me now, I feel and believe I can do this. I am now starting with IELTS and ECA.
Thank you so much once agaiN.
Kind regards
Caroline.
Thanks for all this information!
You saved me from considering applying for immigration through an agent. I have applied for multiple visas by myself before (Singapore, Australia, etc.) but they have all been study or travel ones. Immigration is a whole new game to me and considering the complexity for the first time I was thinking of agents.
A bit about myself, Currently working as a Software Dev, 26.5yrs old, Recent australian IT graduate from a good uni in 2021. CRS score is about 430ish (can become 460-70 depending on a few things I have going).
I came back to India when COVID was a big thing and been stuck here since and recently got into the immigration zone once I had a full year of paid work in my belt.
Was considering WWICS here to represent me but well… I never really put stock in them after talking with them a few times and your blog helped me ease out of my worries.
I am going to apply for EE as a federal skilled person soonish once my WES report comes through.
Question: When it comes to verification of paid work experience by the Immigration authorities, do they require you to submit pay slips for the entire duration, some certifying letter or what? Or upto how many months from their date of asking such a question?
Reason I am asking is because I had some of my initial salary time in cash. (Wasnt aware that might have become an issue until this point)
I’m truly enjoying the design and layout of your site. It’s a very easy on the eyes which makes it much more pleasant for me to come here and visit more often. Did you hire out a developer to create your theme? Excellent work!
I like the efforts you have put in this, thank you for all the great blog posts.
I’m impressed, I must say. Seldom do I come across a blog that’s both equally educative and amusing, and without a doubt, you’ve hit the nail on the head. The problem is something which too few men and women are speaking intelligently about. I am very happy I came across this during my hunt for something concerning this.
What’s up, after reading this awesome article i am as well glad to share my knowledge here with colleagues.
Wao!this is a really detailed and enlightening blog.Thanks so much for this.i can successfully create my ee profile without help now. I have my wes evaluation report plus ielts score ready,but have been kinda hesitating. I will subscribe to your YouTube channel right away. Please I’ll reach out to you from time to time if I experience any difficulty. Thank you
Mam…it’s really helpful blog…
But I need to know more about PNP , do you have any blog about it.
I like to know details like how we can know the requirement in each provinces.
Or do we have to apply in the province and wait for them to accept. I don’t know how to where to begin.
My CRS is good around 460, but still giviny this a try.
Thank you Rahul.
Yes, here you can find all the details about different PNPs : http://mappledreams.com/provincial-nominee-program-pnp-canada/
whoah this blog is magnificent i really like studying your articles. Stay up the good paintings! You already know, many individuals are searching round for this information, you can help them greatly.
Thank you so much for the detailed info, I came to your website from your YouTube video, you are doing great job helping people with your genuine knowledge and experience, all the best to you. I will soon start my Canada immigration process now I am waiting for my transcript to send for ECA and then i will give IELTS, i am quite sure if I need help you will guide me.
Thank You so much for all the info and experience.
Thank you for your appreciation Faizan, glad to know, sure go ahead and do it yourself All the best, Stay connected
Very useful information on your website, I am also trying to fallows these steps to fill my file
Thank you Arjun, glad you find it helpful, kindly share it with them who are looking for the same, stay connected!
Nice write up there. I am commenting all the way from Cameroon.
Pls wish to ask, can a cameroonian also apply through the Express entry?
Hi Vanessa, Thanks. and yes you can apply from Cameroon. Just start doing your research and follow the preparation steps.
Pingback: Sona Founder of 'Mapple Dreams - Express Entry to PR' Shares Her Story
This is really nice and invaluable information. Thank you so much.
Thank you, I’m glad you find it helpful! Stay connected!
This was a really wonderful article. Many thanks for providing this information.
Thank you for your kind words.
Thank you for this website. You should give yourself a pat of the back – this will be a saver for many including myself. I am a 32 year old Australian-Indian living in Melbourne and I intend to apply for Canadian PR. I am just starting out and will require guidance. I will certainly reach out to you.
Thanks.
Regards,
Nikhil
Thank you so much for your valuable feedback, Please share it with your family/friends who are in the search of real information, so that they can save their money and time which is more valuable than anything. I will put all my efforts to keep updating my blog with a lot of more genuine information which is not available for FREE anywhere. Sure go ahead, all the very best with your file processing.